How To Factory Reset Samsung Galaxy Grand 2 SM-G7102

The explained steps in this Guide will help you to Factory Reset Samsung Galaxy Grand 2 with model numbers:
- Samsung SM-G710K for South Korea.
- Samsung SM-G710L for South Korea.
- Samsung SM-G710S for South Korea.
- Samsung SM-G7102 with Dual SIM Cards.
- Samsung SM-G7102T with Dual SIM Cards.
- Samsung SM-G7105.
- Samsung SM-G7105L.
- Samsung SM-G7106 for China.
- Samsung SM-G7108 for China.
- Samsung SM-G7108V for China.
- Samsung SM-G7109 for China.
Samsung Galaxy Grand 2 SM-G7102 Factory Reset Checklist:
1- This process restores the Android platform to its original state and wipe all your data, So backup all the wanted data (Contacts, SMS, Photos, Videos,… Etc).
2- Make sure that you know the Google account name and password.
3- Any other Email accounts info.
4- Samsung accounts info.
5- Any other log-in info and settings you used on your Samsung Galaxy Grand 2.
6- Ensure your Samsung Galaxy device has enough charge level.
Factory Reset Samsung Galaxy Grand 2 SM-G7102 from Recovery Menu:
1- Make sure that your Samsung Galaxy Grand 2 is Off, If not, Then turn it off (Press and hold the Power key, and then tap Power off). And remove the Memory card from it.
2- Take out its battery for 10 seconds, Then put it in again.
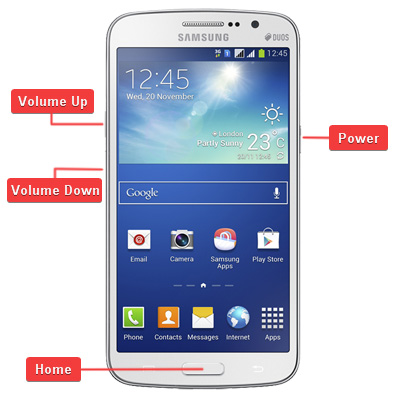
3- Press and hold Volume Up + Home Keys, Then press Power key.

4- Keep pressing the keys until Samsung logo appears,Then release The Power Key only.
5- When you get Factory reset / System Recovery menu on screen, Release all keys.
6- Use the Volume Down key to select Wipe Data / Factory Reset option.
7- Use the Power key to confirm the operation.
8- You need to use the Volume Down key again to select “Yes — delete all user data“.
9- Use the Power key to confirm.
10- After performing the hard reset, Select Reboot System Now option, And confirm it using the Power key.
11- Now your Galaxy Grand 2 will reboot, Wait for it to be fully on and then you can start using it. Select your preferred device language, And follow the on-screen instructions to proceed the initial setup.


Leave a Response