How To Update Samsung Galaxy J7 Core Software Version
By reading this guide, You will learn How To:
- Update your Samsung Galaxy J7 Core via FOTA, Samsung Smart Switch software, And manually using the Samsung Odin flasher.
- How and Where to Download Samsung Firmware Files.
- Prepare your Galaxy device for the software update.
- Select the 4 firmware files in Samsung Odin flash tool.
- Use Samsung Odin flasher.
- Put your Galaxy device into Download Mode (Also known as Samsung Odin Mode).
- Install the latest software (Firmware) update on your Galaxy device.
This Samsung smartphone is known with other model names too. It is known as the Samsung Galaxy Neo in some Latin American countries like Mexico, Argentina, Chile, Jamaica, And Brazil. And the Galaxy J7 Nxt in India.
Samsung Galaxy J7 Core Software Update Methods:
Fortunately, there is more than one method to update your Samsung Galaxy device. So if one of these methods does not work for you, You can try another one.
There are three methods to update the software version of the Galaxy J7 Core:
- Samsung Galaxy J7 Core software update via FOTA.
- Samsung Galaxy J7 Core software update via Samsung Smart Switch.
- Samsung Galaxy J7 Core software update via Samsung Odin.
How To Update Samsung Galaxy J7 Core software via FOTA:
In this software update method, You do not need to use any external tools or programs. All you need to perform this update method is a good WiFi connection. The steps are elementary. All You have to do is reading the Samsung FOTA update guide to update your device via FOTA.
How To Update Samsung Galaxy J7 Core software via Samsung Smart Switch:
This update method is a little bit different, As you need a computer to update your Samsung Galaxy Device. But it is also a simple process and does not require any experience. If you want to try this method, Then read the Smart Switch update guide and follow the steps one by one and you will make it.
How To Update Samsung Galaxy J7 Core software via Samsung Odin:
Indeed I recommended this update method if the other two ones have failed. To update the Galaxy device via Samsung Odin flash tool, You need a computer, Samsung Firmware package, Samsung Odin flasher, Samsung USB drivers, And a USB cable.
In case you do not know how or where to get the Samsung firmware package, Then here is a complete guide on How to download Samsung firmwares.
Tips:
- Make sure to download a newer firmware version from the one installed on your Samsung device.
- Check your Samsung Galaxy J7 Core (Galaxy J7 Nxt, Galaxy J7 Neo) model number (It looks like SM-J701F, SM-J701M, SM-J701MT, …). And download only the corresponding firmware files. You can check your device model number from Settings > About Device > Model Number.
Samsung Galaxy J7 Core Software Update Checklist:
- Download and install the Samsung USB driver for mobile phones on your computer.
- Download and extract the Samsung Odin flash tool (on your computer).
- Extract the Samsung firmware package (on your computer).
- Check the battery level of your Samsung device. Charge it if it is lower than 50%.
- Make sure you know the Google account name and password. And any other Email accounts info, Samsung accounts info…etc.
- Backup any wanted data before updating your device’s firmware (Use the Samsung Smart Switch software to backup all your relevant information).
Tip: Sometimes there are two CSC files inside the Samsung firmware package.
If you are installing firmware with the same country code (Or carrier) like your device already has, Then select the HOME_CSC_xxx file in the CSC field (This one will keep your apps and data). But in case you are installing firmware with a different country code (Or carrier) then select the CSC_xxx file instead.
Samsung Galaxy J7 Core Software Update Step by Step:
1- Run Samsung Odin flasher as Administrator.
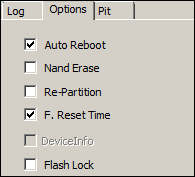
2- Click on the Options tab.
3- Make sure the Auto Reboot, F.Reset Time options are checked.
4- Select the 4 firmware files:
- Click on the BL button and select the file starts with BL_xxxx.
- Click on the AP button and select the file starts with AP_xxxx.
- Click on the CP button and select the file starts with CP_xxxx.
- Click on the CSC button and select the file starts with HOME_CSC_xxx or CSC_xxx.

5- Turn Off your Galaxy device, And wait for 10 seconds.
6- Connect the USB cable to the computer. It is better to use the original USB cable you got with your Samsung device.
7- Put the device into the Download Mode:
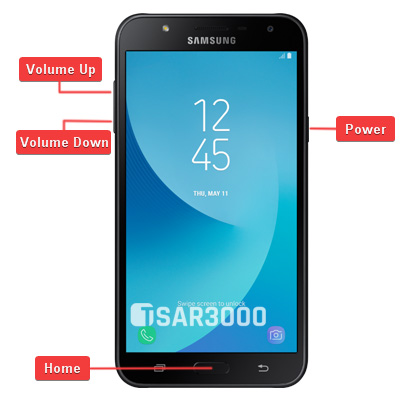
- Press and hold the Home + Volume Down buttons. Then, Press the Power button.
- When the Warning screen appears, Release the buttons.
- Press the Volume Up button to enter Odin Mode (Download Mode).
- Connect the USB cable to your phone.
8- When the computer detects the newly connected device completely, You will see the COM port number of your device at the Odin window (0:[COMxx]).

9- Click on the Start button. Odin flasher will start installing the new firmware files on your Galaxy J7 Core, And reboot it when finishing.
10- Wait until you see PASS! Word at Odin program’s window. That means the update was successful. You can disconnect your Galaxy device from the computer.

11- After your Galaxy device is entirely on, Select your preferred device language. Then, Follow the on-screen instructions to proceed with the initial setup.
12- Done, You have updated the software version of your Samsung Galaxy J7 Core.
Did you use this guide to update your Samsung Galaxy J7 Core?
Which method did you use?
Share your experience in the comments below.








Leave a Response