


")

")

")
")
")
How To Factory Reset The Samsung Galaxy A9 (2018)
")
Find out How to factory reset the Samsung Galaxy A9 2018 using the available methods I listed in this guide. But before, you will learn how to prepare your Samsung device. Also, You will learn how to soft reset the Galaxy A9 2018, And how to wipe its cache partition.
The Samsung Galaxy A9 (2018) comes with the Model Numbers SM-A920F, SM-A920N, And SM-A9200 as Samsung Galaxy A9s for the Chinese market. This Samsung smartphone is powered by Qualcomm SDM660 Snapdragon 660 CPU and Adreno 512 GPU. It has 128GB of Internal Storage and you can extend this storage via external memory card up to 512GB. You can read the full Specs of it at the Samsung Galaxy A9 2018 Full Specs.
I divided this guide into several sections. You can read them all starting from the first one. Or just select the section you want to know more about it.
- Samsung Galaxy A9 2018 Factory Reset Checklist.
- How To Factory Reset the Samsung Galaxy A9 2018 from Settings Menu.
- How To Factory Reset the Samsung Galaxy A9 2018 from Recovery Menu.
- How To Wipe Cache Partition on the Samsung Galaxy A9 2018.
- How To Soft Reset the Samsung Galaxy A9 2018.
– Samsung Galaxy A9 2018 Factory Reset Checklist:
1- The Factory data reset process restores the Android platform (the Galaxy A9 2018 OS) to its original state and wipe all your data, So backup all the wanted data (Contacts, SMS, Photos, Videos,… Etc). You can use the Samsung Smart Switch software to backup all your important data.
2- Make sure that you know the Google account name and password (the Google account you use on this device).
3- Any other Email accounts info.
4- Samsung accounts info.
5- Any other log-in info and settings you used on your Samsung Galaxy A9 (2018).
6- Ensure your Samsung Galaxy device has enough charge level.
– How To Factory Reset the Samsung Galaxy A9 2018 from Settings Menu:
1- Tap Settings icon from the home screen.
![]()
![]()
2- Tap General management.

3- Tap Reset.

4- Tap Factory Data Reset:
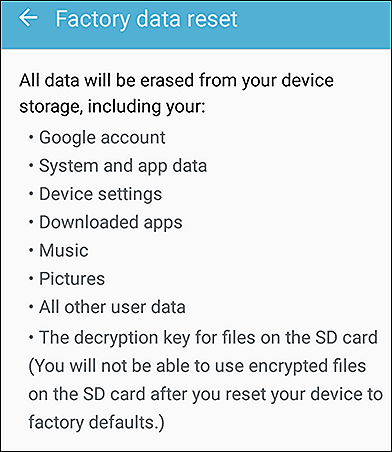
At this point, the Android OS will tell you that all data will be erased from your phone. Including your Google account, System and app data, Settings, Downloaded app, Music, Pictures, And all other user data, So make sure to back up anything you need before moving to the next steps.
5- Tap Reset:
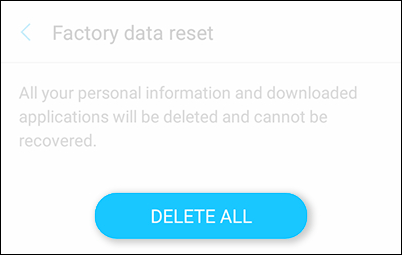
Once again the phone will remind you, That all your personal information and downloaded apps will be erased and can’t be recovered.
6- If the device asks for any password, PIN code, Or pattern, Then enter it and tap on Continue.
7- Tap Delete all.
8- Wait for the Factory data reset process to be completed, And the device will reboot.
9- Done, Now when your Galaxy A9 2018 is fully on, Select your preferred device language, And follow the on-screen instructions to proceed with the initial setup.
– How To Factory Reset the Samsung Galaxy A9 2018 from Recovery Menu:
1 – Ensure your Samsung Galaxy A9 2018 is powered off, If not, Then turn it off (Press and hold the Power key, and then tap Power off).
2 – Press and hold the Bixby + Volume Up buttons, Then press and hold the Power button too.

3 – Wait until the Android logo appears, Then release all buttons.
![]()
![]()
4 – After that, An exclamation mark and Android Logo will appear on your phone’s screen.

5 – If the device stays on this screen, You can try to tap on the screen. Or press the Power button first, Then press the Volume Up button to enter into the Recovery Menu.
6 – After a few seconds, you will see an Android Recovery menu on the screen with many options.
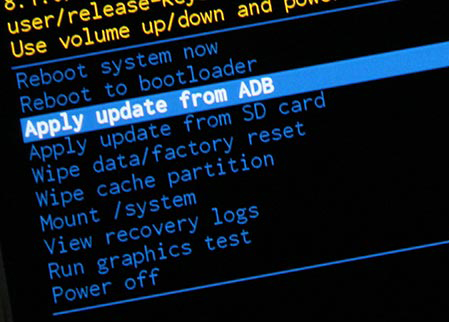
7 – Use the Volume Down button to select Wipe Data/Factory Reset option.

8 – Use the Power button to confirm your selection.
9 – Now use the Volume Down button again to select “Yes“.
10 – Confirm it by pressing the Power button.
11 – Wait for the Factory reset process to be completed.
12 – The Android Recovery menu will return and Reboot System Now option is highlighted.
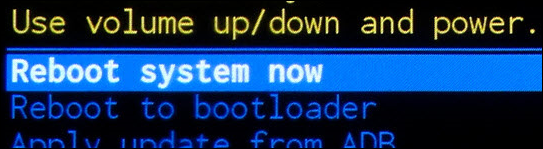
13 – Press the Power button to reboot your Samsung Galaxy A9 2018.
14 – Done, Congratulations, You have restored your Samsung Galaxy A9 2018 to its original factory settings.
15 – When your Galaxy A9 2018 is fully on, Select your preferred device language, And follow the on-screen instructions to proceed with the initial setup.
– How To Wipe Cache Partition on the Samsung Galaxy A9 2018:
Clearing the cache partition of your Galaxy A9 2018 will not delete your personal data (Contacts, SMS, Photos, Videos,… Etc). It will delete the temporary system data which is useful to make the system run more smoothly. It is recommended to wipe the cache partition after installing a new system update.
To wipe the cache partition follow the same steps like (Factory Reset the Samsung Galaxy A9 2018 from Recovery Menu). But instead of selecting the Wipe Data/Factory Reset option, You should select the Wipe Cache Partition option.
– How To Soft Reset the Samsung Galaxy A9 2018:
The Soft Reset means turning your device off and on again. Like Wipe Cache Partition, This operation will not delete your personal data.
If your Galaxy A9 2018 screen is frozen or unresponsive, Then, This operation may fix it:
1- Ensure your device battery has more than 5% of power. If no, Then charge your device first.
2- Press and hold the Volume Down button + the Power button.
3- Keep holding the two buttons until the device vibrate and the Samsung logo appears on the screen. Then release the buttons.
4- Wait for the device to be fully on and check if your problem is fixed.

 Software Version")
")
")
")


")
")
")
")
")
Leave a Response